Table of Content
That's coming from a roofer for the past 17 years. Clay tiles will last a lot longer and weather better for you. Concrete tiles last around 20 years, but clay could last 100, so if this is a family home, you're simply getting more bang for your dollar.
Push down lightly to ensure it adheres. 5 Watch where the leveling compound stops flowing. Smooth down the edges of the compound against the adjoining concrete with a smooth trowel. Wait for the leveling compound to dry completely. In order to make custom made concrete tile at home easily matching your decor or an entire floor for less money,then this guide is for you.
How long for new concrete patio to cure?
Combine with custom saw-cuts and you have a beautiful tile floor at an economical cost that will last indefinitely. Concrete tiles create an organic warmth reminiscent of stone or clay. How to tile a concrete floor – Thin-set First, we have to mix thin-set in a clean bucket. Therefore, you have to fill one forth of the bucket with clean water and pour the thinset mortar . Making your own concrete tiles can give you lots of latitude on your design; you can use a pre-made mold or make your own sand mold from a tile you like.
The goal is to fully incorporate all the materials before adding water in the next step. Concrete projects can be tough work. While there isn’t much you can do about the labor, you can lighten the load on your wallet by making your own concrete mix. The process is simple, and you can tailor your mix for perfect results. You can use self leveling concrete or GFRC , which is a light weight product and very durable. Like any precast product they can be integrally colored or stained and dyed.
Water Content Of Soil - Oven Dry, Infrared, Chemical and Dielectric Method
Create duplicates of a favorite tile using sand as the mold form. Pour playground sand into a cardboard box larger and deeper than the tile. Use enough sand to ensure you can press the sample tile fully into the sand to get an accurate impression. Begin by finding a flat area to set up your molds and spread out your tarp so you don’t get concrete anywhere you don’t want it. Once your area is prepped, make sure to have some fresh water on hand or a hose to deal with spills. Now finally pouring the tiles can begin.Make sure your paste reaches every corner uniformly distribute over the entire area.
Did you know that people's roofs have collapsed because of home made concrete tiles? Suck it up and buy the lightweight ones and you will be safe and sound with a good roof. Place the bucket and a one-fourth inch (0. 6cm) notched trowel near your empty quarter. You may want to put on knee pads during the installation process. Don’t forget to add reinforcement place on the top of cement surface and gently push it till it reaches centre of this mix. And just one last time smooth out.
Quick-drying concrete can be made into inexpensive tiles.
Make sure the area is well ventilated when you use this strong chemical cleaner. Don’t forget to SHARE our articles with your friends, by using the social media widgets. LIKE us to be the first that gets our latest projects and to help us add more free articles.. All content available on or through roofingarchitects.com is for general information purposes only. Site information is not to be replaced with or considered professional advice. After filling the paste you need to disburse the cement mix so that it will reach entire space and look uniform.
Saw cuts created the look of tile in a custom, one of a kind size. If you take the time to level the floor, install a membrane and layout your tile properly, you can improve the look of a concrete floor within a week. Mix the concrete with water, according to package directions, in a bucket.
Opt to cut sheets of “Ditra” membrane to fit the area you are tiling. You will need to apply thinset to the concrete and smooth the membrane sheets down with a trowel. There are 3 basic ways to make concrete tile. You can make molds and pour concrete into your desired size and shape. It can be integrally colored and topically stained and sealed.

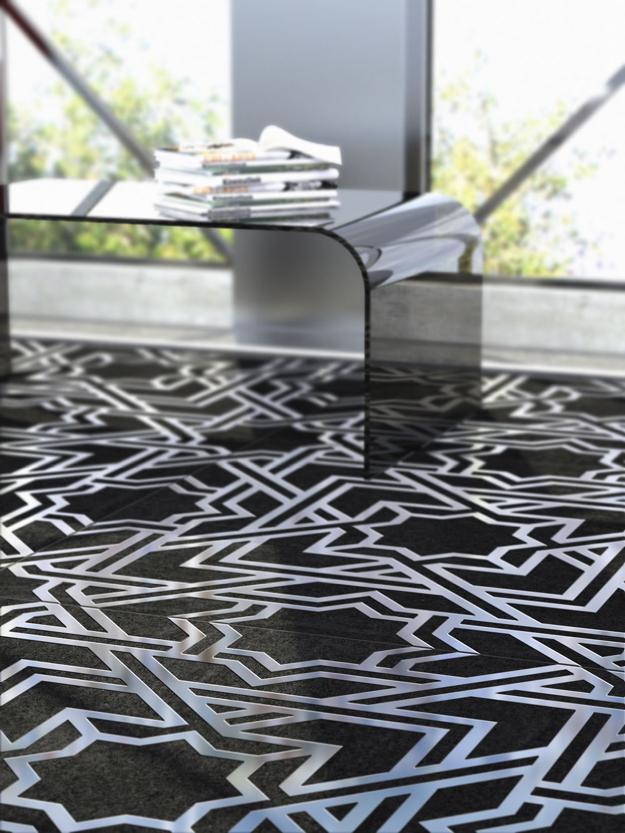
There we have the first home made concrete tile. Making concrete roof tiles at home is possible if you have the right supplies and tools. Photo 2 – This project was completed by Madstone Floors of Barrington Rhode Island for a condo in the Boston area. The custom tile look they achieved was created with our self leveling system called Param. Param was poured 3/8 inch thick over existing concrete with a gray pigment producing a natural polished concrete finish. The sealer used was a low sheen matte finish, ideal for the contemporary look the owner and designer were after.
For homemade molds, remove the tile from the sand and brush away any loose grains. If you plan to make multiples of the same tile, you should always start with the original tile to get the clearest impression. Shot-blasted concrete floors are a unique option that adds an industrial flair to any space. This type of flooring is created by blasting the surface of the concrete with small particles.
Also, clay tiles are pretty easy to make at home, you just get a template and replicate that, they harden in the sun. So, forget about the concrete and go with clay. Once the mix is ready, use a tile screed to cut the mixture into the desired tile shape. Place each tile onto a level surface and use a rubber trowel to smooth the surface. Allow the tiles to dry, then cut them to the desired size using a tile saw. Finally, apply a sealant to protect the tiles from weathering.
This will help the tiles come out of the mold easily without damaging the mold and the tile. Concrete molds are usually made from silicone, which is malleable and stretchy, so make sure to set them on a steady surface for pouring. 6 Purchase an anti-fracture membrane to lay over your leveled concrete. This will help prevent cracking of tiles. You can purchase it in sheets or in liquid form.
Apply sealant to the grout with a sponge paintbrush. If you want to seal the entire tile to resist water, you can apply some sealants with a large sponge. 4 Leave the grout to set for 20 minutes. Return and clean the top of the tile with a damp sponge. Clean it often and ensure it isn’t too wet.


No comments:
Post a Comment